Showing posts with label origami. Show all posts

Thursday, July 7, 2011

Tanabata! The Star Festival

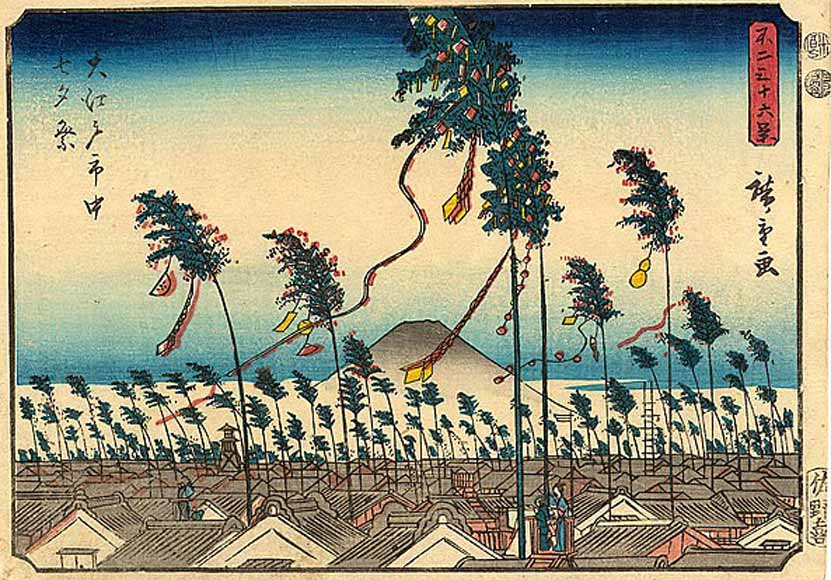
1852 Hiroshige woodblock print of Tanabata in Old Edo


7/7...July seventh is Tanabata (七夕), the Star Festival, the most romantic festival of the year.

I just love the story behind this one:-))  It goes like this:


"Orihime (織姫 Weaving Princess?), daughter of the Tentei (天帝 Sky King, or the universe itself?), wove beautiful clothes by the bank of the Amanogawa (天の川 Milky Way, lit. "heavenly river"?). Her father loved the cloth that she wove and so she worked very hard every day to weave it. However, Orihime was sad that because of her hard work she could never meet and fall in love with anyone. Concerned about his daughter, Tentei arranged for her to meet Hikoboshi (彦星 Cow Herder Star?) (also referred to as Kengyuu (牽牛?)) who lived and worked on the other side of the Amanogawa. When the two met, they fell instantly in love with each other and married shortly thereafter. However, once married, Orihime no longer would weave cloth for Tentei and Hikoboshi allowed his cows to stray all over Heaven. In anger, Tentei separated the two lovers across the Amanogawa and forbade them to meet. Orihime became despondent at the loss of her husband and asked her father to let them meet again. Tentei was moved by his daughter’s tears and allowed the two to meet on the 7th day of the 7th month if she worked hard and finished her weaving. The first time they tried to meet, however, they found that they could not cross the river because there was no bridge. Orihime cried so much that a flock of magpies came and promised to make a bridge with their wings so that she could cross the river. It is said that if it rains on Tanabata, the magpies cannot come and the two lovers must wait until another year to meet."

Of course, there are other versions of the story, but this is the main one (i.e.-- the one I know:-)).  And, you know, it rains nearly every year on Tanabata. :-(  Poor Orihime.  Poor Hikoboshi.  In the sky, they are Vega and Altair--forever separated by the Ama no Gawa (Heaven's River, the Milky Way), meeting only briefly on July seventh...  This is what happens when you have a Star Festival in the middle of the Rainy Season.  I just checked outside-- cloudy, with a chance of rain.  I wonder whether the Magpies will come if it's just cloudy but not  raining?

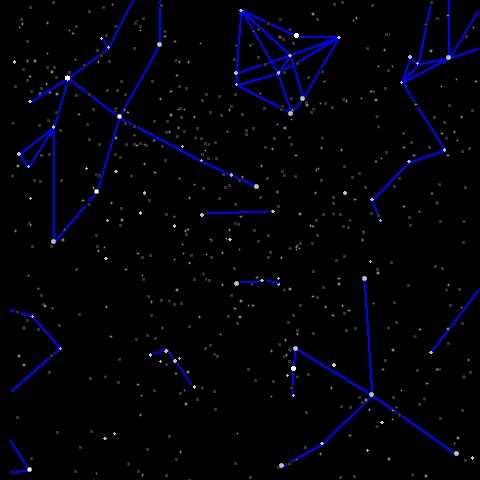
Watch this for a minute-- it fills in!
Vega, the Weaver Star (Orihime in the story-- "Ori" means "to weave" and it's part of my daughter's name "Iori"), the brightest star of the Lyre constellation and forming the top of the Summer Triangle...

Altair, the brightest star of Aquila the Eagle at the bottom of the Triangle, is Hikoboshi, her lover.

Deneb, the brightest star of Cygnus, isn't part of the story, but it does form the rest of the Summer Triangle off to the left (as you're looking at the chart over there-- the three stars of the triangle are easily visible at the start, and get a harder to find as stars fill in).
The traditions associated with Tanabata have come partly from Obon traditions (another summer festival)-- things got a little mixed up when they switched from the Japanese lunar calendar to the Gregorian calendar.

The first thing to do, is go cut some Sasa (笹, bamboo-- the kind pandas like to eat:-) and tie it up or put it into a vase if it's short enough.

Then you decorate with colorful paper chains, kirigami stars (video below), kirigami Ama no Gawa (fold a piece of origami paper in half and in half again lengthwise... make horizontal cuts left, then right, then left, all the way down the paper, being careful not to cut all the way across... unfold and pull down to make the Milky Way!).

Then you write a wish on a colorful strip of paper and tie that onto the branches-- Tanabata!


 The rectangular strips are the Tanzaku (短冊), sometimes written as poetry, more often a wish to pass an exam or improve in a skill (traditionally in sewing and craftsmanship skills for girls, in handwriting for boys).

Click that photo there, and you can see the "Ama no Gawa" better (it's done in silver origami paper--very easy to make:-).


Here's the Kirigami Star again-- it's pretty if you use foil paper or sparkly or hologram paper.


Even the grocery store had signs up for Tanabata (you can see the little drawing of bamboo with wish papers on it bottom left)... the big kanji on the right    "七夕 " say "Tanabata" (the kanji read as "seven--evening, but the meaning of the word Tanabata is rather more confusing).


tomatoes for 77yen apiece...
It took me a while to figure out why lots of things were on sale for 77yen, or 177yen, or 277yen...

July 7th... 7/7... Star Festival... 77yen.  Duh.  I was slow on the uptake today;-))

Happy Tanabata! :-))

Mata asobou, ne!

Friday, May 6, 2011

Weekend Origami-- Kabuto Helmet for Kodomo no Hi

Fold the Kabuto (Samurai Helmet) for Children's Day!


Here's a pretty simple kindergarten level origami--all three of my kids folded this in their third year of kindergarten when they were 5.

It's the Kabuto--the Samurai Helmet that, along with the Koinobori carp streamers, is the traditional symbol of Children's (originally Boy's) Day on May 5.  This is one origami that's not only easy to fold, but will be instantly recognizable to any Japanese person, since *everybody* learns how to fold it (ok, so, my husband has forgotten how, but he *did* learn at one point).  Use any size square paper in any color you like-- and newspaper works just fine!  In fact, that's what kids use at school to fold this since you can make it big enough to actually wear on your head:-))

Kabutomushi:  Allomyrina dichotoma


...And if "Kabuto" sounds like a bug to you, well, you'd be right:-))


The Japanese Rhinoceros Beetle is Kabutomushi in Japanese.  See that big horn on his head?

Kabuto crests


...the Japanese think that beetle's big horn looks like the crest of a samurai helmet, hence his name:  Kabuto-mushi (helmet beetle).


A hand-drawn postcard for Kodomo no Hi featuring a Kabuto

You wanted to know all that, right?  Good.  Go get some paper...


...and let's fold!  Cici will show you how (if her hair doesn't get in the way...).   Have fun and Gambatte!


How'd you do?  Does yours look more or less like the photo at top?  Yattaaa---!  Yoku dekimashita:-)) (well done!)

Mata asobou, ne!

Sunday, February 13, 2011

Weekend Origami-- Valentine's Hearts

Since tomorrow is Valentine's Day, I thought I'd share a few Origami Valentine's hearts!  Three hearts, in fact--from Very Easy to Medium Easy to A Little Bit Harder.

This first one uses just 1/3 of a sheet of origami paper (a 5 x 15cm strip from a 15x15cm square), so of course you could make three hearts from one sheet if you wanted to.  I'm folding in the video below, and Koshi is camera-man (please excuse the bobbling--Koshi was trying to get Teddy to be quite.  It's Teddy you can hear at the end suddenly saying "Barentine!"... much giggling then ensued....)


How was that?  Dekita, ka na?  Were you able to fold that one?  Here's one that is just a wee bit more complicated (but not much).  This one uses a whole sheet of paper:


Dekimashita ka?  Did you fold that one, too?  It's not too difficult.  Here's one more that uses the "hiraite-tsubusu"  ("open out- and- smush flat") maneuver.  My daughter (first grade) can do this, but she started doing origami in kindergarten.  Even still, I think most kids from 7 or 8 can probably do this.  If you're just starting out, try the easier hearts first before folding this one.  The move I just mentioned ("open out-and-smush") means basically folding a triangle, then opening the triangle up and flattening it into a diamond shape.  It's a move used in origami a *lot*.  Give it a go!


Happy Valentine's Day!

Mata asobou, ne!

Wednesday, February 2, 2011

Weekend Origami--Setsubun Ogre!

dried soybean snacks for eating and throwing--I *love* this packaging:-))

 February third is the wonderful and wacky Bean-Throwing Festival in Japan, "Setsubun" in Japanese. "Seasonal division" literally, it was traditionally part of the spring festival and is associated with the Lunar New Year.  If you think of it that way-- a festival where you throw beans at ogres (those ogres, you know, they *hate* beans) to drive evil spirits out of the home and bring happiness and good luck in for the New Year-- it seems a vaguely sensible thing to do.  I'll explain more about that tomorrow.

For today, I thought you might like to try making an origami Oni (ogre).  There are Red Ogres (Aka Oni) and Blue Ogres (Ao Oni), like this:

Aka Oni, Ao Oni


This year's Oni Pan--the boys got Ao Oni, and Cici got Aka Oni.  Fun little cream-filled Oni buns, but different than last year's buns.


Oni origami is fairly simple--maybe not quite 3-year-old simple, but probably 6-year-old simple, and definitely elementary school simple (my daughter had no problem following along making these).

In fact, my daughter made the red oni bottom left, "Fuku" (Happiness) in the middle, and the blue oni bottom right.  Koshi made the tiny red one, and it's his hands folding the Aka Oni in the video below.


For the eyes and fangs, I drew with a thick black marker on a piece of white paper and then cut them out and Cici glued them on.  Or, just draw the whole face on with black marker--suit yourself:-))

Dekita, ka na?  Did you do it?  Gambare, ne!
Mata asobou, ne!

Thursday, December 23, 2010

Weekend Origami For Christmas--Candle, Candy Cane, and Tree

(and brief blog break 'til Sunday, Dec. 26-- Gomen Nasai!  No Field Notes this week...:-((

Three fun origami for Christmas, from *very* simple (= kindergarten ok) to medium easy (first grade and up, or older kindergartner with some help).

First, the easiest one:  Christmas Candy Cane!  Cici is using a 5cm x 5cm sheet, but you can use any size, or cut a larger size sheet into fourths, or use a big piece to hang on the tree.  Fold not quite all the way to the top (leave some white showing), turn over, and roll up!  Like this:


See?  Easy!  The next easiest one is the candle--lower elementary age kids would have no problem making this, and 5 to 6-year-olds still in kindergarten should be able to do this, too.  A four-year-old might need a little (more if they haven't done much origami, less if they do a lot of it).  My daughter is using gold foil origami paper (just because it looks pretty for the flame--making several using red, orange, yellow would look good, too).  Cici's paper is a fourth of a 15 x 15 cm sheet (thus 7.5 x 7.5 cm).  First fold a triangle, then in half again and unfold for your guide folds.  Like this:


Easy, desho!  The Christmas Tree is a little harder--it involves the "open out and smush (hiraete, tsubusu)" move, which my daughter found a little challenging because it's in a small place at the bottom of the tree (regular open-and-smush she can do).  Make the basic ice cream first...


(Thanks to my husband for the camera work above:-))

Here's a tree I folded with the Origami Star (7.5 x 7.5 sheet) stuck on top and little candy canes (as above) and paper punch shapes glued on:


So what did you do for the Winter Solstice?  Here it's called Tooji, and you're supposed to eat kabocha (pumpkin--didn't get to that this year) and have a Yuzu (Citron) Bath, which we did.  Smells nice--very relaxing and warming:-))


...our lovely (not) bathtub (it is nice and deep, though)


...above are some of the Yuzu (citron) I put in (yup--just like that), along with a Yuzu bath bomb that dissolves in the hot water (40deg C) and, at right, a Yuzu herb packet (like a teabag that you put in the water).  That bathtub smells so good....  You can see the happy family all in the bath together at the bottom of the package--which is probably unimaginable for most Americans (possibly Europeans, too, for that matter).  If you've seen  My Neighbor Totoro, you'll see the two girls in the tub with their father.  Which is *completely* normal.

Merry Christmas, Happy Holidays, and Happy New Year.
Yoi O-Toshi O!  Me-ri Kurisumasu!

Sunday, December 19, 2010

Weekend Origami--Kirigami Stars (and Other Stuff)

Paper cutting is as fun to do as regular origami, although kids need to be a *little* older to be able to cut through the layers of paper (more like 6 than 3 or 4).  Lower elementary grade kids should definitely be able to cut out the One-Cut Star shown in the video below.  The fold shown is the 10-fold (there is also a 4-fold, 6-fold, 8-fold, and 12-fold).  First you fold, then you cut--just one straight line, and you get a lovely star!  Very mysterious...;-))


Did you do it?  Notice that the angle of the cut changes the shape of the star--a less acute angle makes a "fatter" star, a deeper angle makes a star with skinnier arms like this:


See how the angle on the yellow paper is steeper than the one I cut for the silver star?  It comes out looking like the photo below:

And what about that blue paper with two lines on it?  Guesses?  Right--an outline star plus a smaller bonus star...


....kawaii, desho!


And you needn't be restricted to straight lines.  A curve with a nick at the top gets you this:

Springtime Cherry Blossom

For the more adventurous, how about drawing a little person on top of the straight line for the star? (I've used a black marker to draw my lines so they show up in the photos--you needn't.  Lightly drawn lines in pencil are fine, or freehand if you are so bold:-))


We are the World...

...We are the Children...


And feel free to draw your own shape across the middle of the 10-fold!  I tried drawing holly:


Merry Christmas to All
I'll try to get some other Christmas Origami up this week--probably the Candle, the Tree, and the Stocking:-)).  Gambatte, ne!

Mata asobou, ne!

Tuesday, December 14, 2010

Weekend Origami--Origami Stars: Part II

This star is a little more difficult than the Message Star--it uses only one sheet of paper folded down to get the star shape, rather than three sheets glued together.  But my first grader can do it, so it's definitely within the reach of kids in the lower elementary grades. Kindergartners....maybe, if they're already 6 and have done simpler origami before.  If not--have a go, Mom!   Use a regular 15cmx15cm sheet of paper the first time or two you try it, then try making it with smaller squares for decorating packages or to put on top of an origami Christmas tree (which I'll put up next Sunday:-)).  Be sure to have the color side up to put in the vertical guide folds, and flip to the white side to put in the diagonal guide folds...


Make a bunch and hang them on the tree... or from the ceiling... :-))
Mata asobou, ne!

Monday, December 13, 2010

Weekend Origami--Stars Part I: Message Star

The Message Star is the easiest version of an origami star--my kids did this one second or third year in Yochien, so it's totally easy to do with 4 to 6-year-olds.  Or make small ones (1/4 of a regular sheet of origami paper) from gold or silver foil to use as present name tags:))  You need three pieces of paper, all the same size.  They can be all the same color, although I used three different colors in the video so it would be easier to see what Cici's doing.  Start off by folding all three pieces in half to make three triangles...


Make a bunch!  Mata asobou, ne!

Sunday, November 14, 2010

Weekend Origami--More for Fall


Last time we made acorns, so I thought I'd put up a slightly more challenging way to make acorns that, made a little differently, also makes chestnut.  And since my daughter had to make Ginko leaves and Ki no Ko (mushrooms) for the school festival, I'll just put those up, too:))  Let it be noted, however, that 4-year-olds probably can't handle these.  These are for Mom or Dad or Big Brother/Sister to make for little ones to play with--or to decorate with.  The Ginko leaves can be made in different colors of paper (or color-gradated paper) and taped down a length of thin twine and used to make presents pretty.  Or hung down the window:))

First, the acorn/chestnut (drawing faces optional:))  My daughter is making this, so she makes a couple of small mistakes...  when folding up from the bottom, fold up in thirds so that the folded edge is even with the center horizontal guide fold.  Then fold up one more time--the edges should be even.  Turn it over and fold the points in to just a little past the center vertical guide fold (turn it over and eyeball it so it looks right--chestnuts are kind of fat, so don't make it too skinny).  Tuck the right side into the left side and knick the corners back.  Dekiagari!  Done!


Got that?  Good!  Now try a Ginko Leaf--when your fingers get used to making these, you'll be able to fold a dozen of them in five minutes (should you desire to make that many).  Hold tight and pull the back flap down gently but firmly until you can see the split.  Then just mash it down flat. 


Hai, dekiagari!  They're kind of addictive once you get the hang of making them...

One more--Cici wanted to show you the mushroom she can make.  She made over a dozen of these for last weekend's Fall Festival (Furi Ai Hiroba).  The cool thing about learning to make the mushroom is that it's a little mysterious looking 'til just at the end when you flip it over and, ta-da!--suddenly you're looking at a mushroom.  She's using a piece of paper 15x15cm, but we also made some using 5x5cm and 2.5x2.5cm (see photo below video).  You'll also, if you haven't ever done this before, learn a common move in origami--namely, "hiraite, tsubusu", "open up and flatten".  After folding a triangle, then in half and a smaller triangle, slide you finger up inside one of the flaps to open it, then flatten it so it looks like a diamond.  Turn it over and do the same on the other side, so that you're now looking at a diamond shape instead of a triangle.  That's probably confusing, so watch Cici do it:


The big one was made using a 15x15cm piece of paper, the middle size one a 5x5cm piece, and the smallest 2.5x2.5.

 Have your fingers fallen off yet?;-)


Mata asobou, ne!

Sunday, November 7, 2010

Weekend Origami--In Which We Make Acorns

My daughter "had to" make origami acorns for next weekend's festival at school as homework.  I say "had to", because I've never seen a kid be so happy about homework:))  There is more than one way to fold an acorn, and this is the easiest version.  This is the kindergarten/first grade version that she's folding in the video below. 

You can use a full size sheet of origami paper, or 1/4size (purchased, or cut a full-size piece into fourths).  Cici is folding with a full-sized piece.  If you have children 3 to 6 years of age, this is doable origami-- meaning they could fold it without help after being shown.  My kids folded this version during the second year of kindergarten when they were 4-turning-5 years old.

First, fold a house !


Turn the house over, fold a flap up evenly to the bottom of the roof.  Fold the sides in even with the center fold.  Turn it back over, draw a face-- Owari! (All done!)  My daughter made over a dozen of these last night.

Mata asobou, ne!

Friday, April 2, 2010

The Coolest Origami Ever and How to Fold a Dog

In vain have I searched--it will not be found, at least not tonight.  The coolest origami i have ever seen was on TV (maybe NHK, maybe Tokyo Terebi--can't remember).  It was something like a variety show, but there was a segment featuring three origami masters who were given the task of folding "from life", the results of which would then be voted on.  Standing at one end of a pier with large pieces of paper, on the signal, they ran to the other end where a large aquarium was set up on a table.  They had to grab a net, catch something swimming around in the tank, transfer it to their own tank, and create an origami version of whatever they had just pulled out of the large tank.  An octopus.  A small skate (ray).  A puffer fish.  And they did this in an unbelievably short amount of time.  It was jaw-dropping, to say the least.

But since I can't seem to find a video of it on YouTube, here's the other coolest origami ever, from origami master Kamiya Satoshi:

the coolest origami ever

(sorry--I would put the YouTube video in, but I haven't figured out how to embed a video yet)

Yeah--wow, right?  All from one 2mx2m piece of paper.  Origami hardly seems like the right word to describe what he does--more like sculpture which happens to be done with a piece of paper rather than folding.  But folded it is, as they show towards the end of the clip.

Over the next several days, I'd like to give you a sense of how he does what he does by posting some how-tos for some very simple origami which will, I hope, help you gain a beginning sense of how the same folds can become many different things.   In a way, origami masters approach origami in somewhat the same way that a chess master approaches a game of chess--with moves stored in the memory in large chunks which enables them to reproduce the chessboard perfectly even if you remove all the pieces.  Origami folds are stored in the memory rather like that--do the same series of folds for the (crane, for example), then do this.  As you get better at origami and learn to fold slightly more complicated pieces, it becomes possible to start making one thing and then just... fold off in a different direction and see if anything comes out.

But fear not, today I'm not going throw you to the origami lions.  Just to the dogs.  Here's the simplest possible dog, plus a variation on the ears.

Pick a color you like, reverse white side can be a white dog, of course.

First, fold a mountain upsidedown!
Big paper or small, take your pick.  Or both to make mommy dogs and baby dogs.


Fold in half again and unfold--guide fold made!
(folding and unfolding just for a guide fold is done a *lot*, so you can see where to fold or to make it easier to fold there later).


Ears:  fold down a flap a little way over from the center guide fold you made before (dog has to have a head:))


Woof!  That's all you have to do to make a dog!

Get a black marker or crayon to put on a face.

Use lots of colors and make an origami version of  Go, Dog, Go!  Red dogs, blue dogs, green dogs, yellow dogs, black dogs and white dogs are all at a dog party.  What a dog party!


here's the ear variation.   Mom will probably have to do this manoeveur (unless you're doing this with a child 6 or older).

Stick your finger inside one of the ears to make it poof out, then.....


....and smoosh it down flat--the place it was originally folded will now run down the middle of the ear.


See how the ear looks floppier?

You can also knick the bottom under to make the chin, or leave it as is and draw the point as the nose.


Two kinds of ears, two kinds of faces, and my daughter's fingers...

She decided she wanted a dalmation, so she folded the color side to the inside with white outside and drew spots on with a black marker.


Fold a big house and a little dog--voila!  A doghouse:)  And if you happen to be folding a dog party, you can even fold a little ice cream to have falling out of the tree ( that was the  reaction of my oldest son  when he was 2 to that big 2-page spread.  He would notice the ice cream cone falling out of the tree and say "dirty!").

Happy folding!  Mata asobou, ne!

Sunday, February 7, 2010

Weekly Origami--Ice Cream

Today's origami uses almost the same folds as the house, just going a different direction.  If your little one (around 3 to 4) can do the main 3 folds, mom or dad can nick the corners back to give it that rounded "scoop" look.  Use different colors of paper for different "flavors"--make lots and play "ice cream shop":))

So, first fold your paper in half and make a mountain (big triangle)--colored side outside if you want vanilla ice cream, colored side inside if you want a "flavor".  Then unfold--guide fold made!  Like this:


I'm making "chocolate" in the photo.  Next, fold one corner over to the guide line, carefully matching up the side edge to to guideline:

and fold the other side the same way in to the middle...


Done!  Chocolate ice cream in its simplest form, sans calories.  If this version satisfies your youngun', leave it at that.  If not, mom or dad can nick the corners back for the "scoop" effect, like this:


Make 31 Flavors and play "Ice Cream Store".  Put them away in an envelope and play again tomorrow:)  Or until they fall apart, get slobbered on, tear, or get eaten by the dog.


Don't think about fine motor skills--it'll spoil the fun.  Just make a bunch and enjoy!

Mata asobou, ne!

Saturday, January 30, 2010

Weekend Origami

Oohhh--yeah, Origami!  I'll teach my daughter(son) how to fold a crane, and sit there radiating smugness while s/he unconsciously gains important fine motor and geometric-spatial skills! (Ick! Quit that!)

And then your 3-year-old...wads the paper into a ball...wants to tear it to bits...throws a tantrum because s/he "can't!"...

Ok--so how about the simple kind?  The kind my kids learned to do in kindergarten.  As in, fold a sqare in half for a mountain.  Really, that's how they start out over here (with 3-year-olds, some of whom are still in diapers, so how hard can they make it?), with really young kids using regular origami paper which is cheap (dollar shop) here, but  possibly not so (or not readily available) in other countries.  No worries--thin catalogue paper works just fine, as does newspaper.  My kids' teachers used both of those at Yochien (kindergarten), too.  Start simple--no need to give yourself a headache trying to fold something out of a book with 47 steps.  How about 3?

My oldest son used to come home at least once a week with an intricately folded "shuriken" ("throwing star"-all the boys want those) made from two pieces of paper torn from a catalogue.  His two-year-old brother, of course, coveted it as soon as he saw it.  And, not knowing what to actually *do* with it, pulled it halfway apart--resulting in much wailing, smiting (of younger brother), and pleas to mommy to "fix it".  No clue.  Major headache.  I had to get a japanese origami book, look up a bunch of words, and learn how to fold the fool thing myself just to achieve a temporary cease-fire.  Maybe I should have started kindergarten myself...
I'll post the shuriken later-- it's fun to fold side-by-side with your kindergartner once they can fold simpler things evenly.  By "kindergartner", I mean third year, like a 5 1/2 or 6-year-old.

So, let's make a house!  Or, heck, a whole street of houses, big ones and little ones, decorated to taste.  Make them stand-alone, or glue them onto a piece of construction paper, as you like.  It's Saturday for me here in Tomorrowland, but for anybody reading this from the Western Hemisphere, why it's still Friday, so you get a little jump on the weekend.  Figure it out *before* the weekend,eh. 

1) fold a thin square in half, and unfold (guide fold made)
2)fold the top corner down, lining up the edge of the paper with the guide fold.
3)fold the other corner down, trying not to have a white space in the middle.
4)et voila!  A house.  Draw a door, some windows, whatever you like.  Glue down the flaps, or not.
    Leave the roof flaps loose and draw surpises underneath.  Have fun!  Photos below:


Next time,  Origami Ice Cream!! Or Tulips...decide later:)  So fold away, and just have fun.  Brush the child psych experts off your shoulder, and tell the early childhood specialists to shove off.  

Mata asobou, ne!