This star is a little more difficult than the Message Star--it uses only one sheet of paper folded down to get the star shape, rather than three sheets glued together. But my first grader can do it, so it's definitely within the reach of kids in the lower elementary grades. Kindergartners....maybe, if they're already 6 and have done simpler origami before. If not--have a go, Mom! Use a regular 15cmx15cm sheet of paper the first time or two you try it, then try making it with smaller squares for decorating packages or to put on top of an origami Christmas tree (which I'll put up next Sunday:-)). Be sure to have the color side up to put in the vertical guide folds, and flip to the white side to put in the diagonal guide folds...
Make a bunch and hang them on the tree... or from the ceiling... :-))
Mata asobou, ne!
Showing posts with label travel play. Show all posts
Showing posts with label travel play. Show all posts
Tuesday, December 14, 2010


Sunday, November 28, 2010
Playin' Inside--Dragonballs Finger Game
Taking public transportation with two boys became so much easier when they learned how to play the Dragonballs game that's making the rounds of the elementary schools. At least, as long as they whisper:)) This game kept my two amused for train rides, bus rides, and boring rainy weekends. I've even heard them playing it in the bathtub. Extremely simple, requiring no equipment beyond two pair of hands, the object is to win by making the blasting "Haaaaa!" motion when your opponent is "charging".
There are three motions that you say while making the hand motion:
"Barrier!"
 This motion blocks your opponents blast...
 "Charge!"
....this motion charges you up so you can blast
(you have to charge up after eight barriers, or you lose automatically)
 "Haaaaaa!"
Blasting energy! To win, you must make this motion at the same time that your opponent is "charging". If your opponent puts up "barrier", you keep playing.
Clap twice between each motion until one person wins! Which probably sounds boring to adults--but for elementary-age kids? *Loads* of fun--trust me:))
Watch Koshi and Teddy play:
This game has saved my sanity more times than I can count:))
Mata asobou, ne!
There are three motions that you say while making the hand motion:
"Barrier!"


....this motion charges you up so you can blast
(you have to charge up after eight barriers, or you lose automatically)

Blasting energy! To win, you must make this motion at the same time that your opponent is "charging". If your opponent puts up "barrier", you keep playing.
Clap twice between each motion until one person wins! Which probably sounds boring to adults--but for elementary-age kids? *Loads* of fun--trust me:))
Watch Koshi and Teddy play:
This game has saved my sanity more times than I can count:))
Mata asobou, ne!
Friday, April 2, 2010
The Coolest Origami Ever and How to Fold a Dog
In vain have I searched--it will not be found, at least not tonight. The coolest origami i have ever seen was on TV (maybe NHK, maybe Tokyo Terebi--can't remember). It was something like a variety show, but there was a segment featuring three origami masters who were given the task of folding "from life", the results of which would then be voted on. Standing at one end of a pier with large pieces of paper, on the signal, they ran to the other end where a large aquarium was set up on a table. They had to grab a net, catch something swimming around in the tank, transfer it to their own tank, and create an origami version of whatever they had just pulled out of the large tank. An octopus. A small skate (ray). A puffer fish. And they did this in an unbelievably short amount of time. It was jaw-dropping, to say the least.
But since I can't seem to find a video of it on YouTube, here's the other coolest origami ever, from origami master Kamiya Satoshi:
the coolest origami ever
(sorry--I would put the YouTube video in, but I haven't figured out how to embed a video yet)
Yeah--wow, right? All from one 2mx2m piece of paper. Origami hardly seems like the right word to describe what he does--more like sculpture which happens to be done with a piece of paper rather than folding. But folded it is, as they show towards the end of the clip.
Over the next several days, I'd like to give you a sense of how he does what he does by posting some how-tos for some very simple origami which will, I hope, help you gain a beginning sense of how the same folds can become many different things. In a way, origami masters approach origami in somewhat the same way that a chess master approaches a game of chess--with moves stored in the memory in large chunks which enables them to reproduce the chessboard perfectly even if you remove all the pieces. Origami folds are stored in the memory rather like that--do the same series of folds for the (crane, for example), then do this. As you get better at origami and learn to fold slightly more complicated pieces, it becomes possible to start making one thing and then just... fold off in a different direction and see if anything comes out.
But fear not, today I'm not going throw you to the origami lions. Just to the dogs. Here's the simplest possible dog, plus a variation on the ears.
Pick a color you like, reverse white side can be a white dog, of course.
 First, fold a mountain upsidedown!
Big paper or small, take your pick. Or both to make mommy dogs and baby dogs.

Fold in half again and unfold--guide fold made!
(folding and unfolding just for a guide fold is done a *lot*, so you can see where to fold or to make it easier to fold there later).

Ears: fold down a flap a little way over from the center guide fold you made before (dog has to have a head:))

Woof! That's all you have to do to make a dog!
Get a black marker or crayon to put on a face.
Use lots of colors and make an origami version of Go, Dog, Go! Red dogs, blue dogs, green dogs, yellow dogs, black dogs and white dogs are all at a dog party. What a dog party!

here's the ear variation. Mom will probably have to do this manoeveur (unless you're doing this with a child 6 or older).
Stick your finger inside one of the ears to make it poof out, then.....

....and smoosh it down flat--the place it was originally folded will now run down the middle of the ear.

See how the ear looks floppier?
You can also knick the bottom under to make the chin, or leave it as is and draw the point as the nose.

Two kinds of ears, two kinds of faces, and my daughter's fingers...
She decided she wanted a dalmation, so she folded the color side to the inside with white outside and drew spots on with a black marker.
Fold a big house and a little dog--voila! A doghouse:) And if you happen to be folding a dog party, you can even fold a little ice cream to have falling out of the tree ( that was the reaction of my oldest son when he was 2 to that big 2-page spread. He would notice the ice cream cone falling out of the tree and say "dirty!").
Happy folding! Mata asobou, ne!
But since I can't seem to find a video of it on YouTube, here's the other coolest origami ever, from origami master Kamiya Satoshi:
the coolest origami ever
(sorry--I would put the YouTube video in, but I haven't figured out how to embed a video yet)
Yeah--wow, right? All from one 2mx2m piece of paper. Origami hardly seems like the right word to describe what he does--more like sculpture which happens to be done with a piece of paper rather than folding. But folded it is, as they show towards the end of the clip.
Over the next several days, I'd like to give you a sense of how he does what he does by posting some how-tos for some very simple origami which will, I hope, help you gain a beginning sense of how the same folds can become many different things. In a way, origami masters approach origami in somewhat the same way that a chess master approaches a game of chess--with moves stored in the memory in large chunks which enables them to reproduce the chessboard perfectly even if you remove all the pieces. Origami folds are stored in the memory rather like that--do the same series of folds for the (crane, for example), then do this. As you get better at origami and learn to fold slightly more complicated pieces, it becomes possible to start making one thing and then just... fold off in a different direction and see if anything comes out.
But fear not, today I'm not going throw you to the origami lions. Just to the dogs. Here's the simplest possible dog, plus a variation on the ears.
Pick a color you like, reverse white side can be a white dog, of course.

Big paper or small, take your pick. Or both to make mommy dogs and baby dogs.

Fold in half again and unfold--guide fold made!
(folding and unfolding just for a guide fold is done a *lot*, so you can see where to fold or to make it easier to fold there later).

Ears: fold down a flap a little way over from the center guide fold you made before (dog has to have a head:))

Woof! That's all you have to do to make a dog!
Get a black marker or crayon to put on a face.
Use lots of colors and make an origami version of Go, Dog, Go! Red dogs, blue dogs, green dogs, yellow dogs, black dogs and white dogs are all at a dog party. What a dog party!

here's the ear variation. Mom will probably have to do this manoeveur (unless you're doing this with a child 6 or older).
Stick your finger inside one of the ears to make it poof out, then.....

....and smoosh it down flat--the place it was originally folded will now run down the middle of the ear.

See how the ear looks floppier?
You can also knick the bottom under to make the chin, or leave it as is and draw the point as the nose.

Two kinds of ears, two kinds of faces, and my daughter's fingers...
She decided she wanted a dalmation, so she folded the color side to the inside with white outside and drew spots on with a black marker.
Fold a big house and a little dog--voila! A doghouse:) And if you happen to be folding a dog party, you can even fold a little ice cream to have falling out of the tree ( that was the reaction of my oldest son when he was 2 to that big 2-page spread. He would notice the ice cream cone falling out of the tree and say "dirty!").
Happy folding! Mata asobou, ne!
Sunday, February 7, 2010
Weekly Origami--Ice Cream
Today's origami uses almost the same folds as the house, just going a different direction. If your little one (around 3 to 4) can do the main 3 folds, mom or dad can nick the corners back to give it that rounded "scoop" look. Use different colors of paper for different "flavors"--make lots and play "ice cream shop":))
So, first fold your paper in half and make a mountain (big triangle)--colored side outside if you want vanilla ice cream, colored side inside if you want a "flavor". Then unfold--guide fold made! Like this:

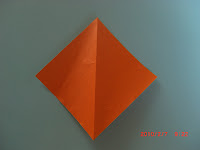 I'm making "chocolate" in the photo. Next, fold one corner over to the guide line, carefully matching up the side edge to to guideline:


Don't think about fine motor skills--it'll spoil the fun. Just make a bunch and enjoy!
Mata asobou, ne!
So, first fold your paper in half and make a mountain (big triangle)--colored side outside if you want vanilla ice cream, colored side inside if you want a "flavor". Then unfold--guide fold made! Like this:


and fold the other side the same way in to the middle...

Done! Chocolate ice cream in its simplest form, sans calories. If this version satisfies your youngun', leave it at that. If not, mom or dad can nick the corners back for the "scoop" effect, like this:

Make 31 Flavors and play "Ice Cream Store". Put them away in an envelope and play again tomorrow:) Or until they fall apart, get slobbered on, tear, or get eaten by the dog.

Don't think about fine motor skills--it'll spoil the fun. Just make a bunch and enjoy!
Mata asobou, ne!
Saturday, January 30, 2010
Weekend Origami
Oohhh--yeah, Origami! I'll teach my daughter(son) how to fold a crane, and sit there radiating smugness while s/he unconsciously gains important fine motor and geometric-spatial skills! (Ick! Quit that!)
And then your 3-year-old...wads the paper into a ball...wants to tear it to bits...throws a tantrum because s/he "can't!"...
Ok--so how about the simple kind? The kind my kids learned to do in kindergarten. As in, fold a sqare in half for a mountain. Really, that's how they start out over here (with 3-year-olds, some of whom are still in diapers, so how hard can they make it?), with really young kids using regular origami paper which is cheap (dollar shop) here, but possibly not so (or not readily available) in other countries. No worries--thin catalogue paper works just fine, as does newspaper. My kids' teachers used both of those at Yochien (kindergarten), too. Start simple--no need to give yourself a headache trying to fold something out of a book with 47 steps. How about 3?
My oldest son used to come home at least once a week with an intricately folded "shuriken" ("throwing star"-all the boys want those) made from two pieces of paper torn from a catalogue. His two-year-old brother, of course, coveted it as soon as he saw it. And, not knowing what to actually *do* with it, pulled it halfway apart--resulting in much wailing, smiting (of younger brother), and pleas to mommy to "fix it". No clue. Major headache. I had to get a japanese origami book, look up a bunch of words, and learn how to fold the fool thing myself just to achieve a temporary cease-fire. Maybe I should have started kindergarten myself...
I'll post the shuriken later-- it's fun to fold side-by-side with your kindergartner once they can fold simpler things evenly. By "kindergartner", I mean third year, like a 5 1/2 or 6-year-old.
So, let's make a house! Or, heck, a whole street of houses, big ones and little ones, decorated to taste. Make them stand-alone, or glue them onto a piece of construction paper, as you like. It's Saturday for me here in Tomorrowland, but for anybody reading this from the Western Hemisphere, why it's still Friday, so you get a little jump on the weekend. Figure it out *before* the weekend,eh.
1) fold a thin square in half, and unfold (guide fold made)
2)fold the top corner down, lining up the edge of the paper with the guide fold.
3)fold the other corner down, trying not to have a white space in the middle.
4)et voila! A house. Draw a door, some windows, whatever you like. Glue down the flaps, or not.
Leave the roof flaps loose and draw surpises underneath. Have fun! Photos below:


Next time, Origami Ice Cream!! Or Tulips...decide later:) So fold away, and just have fun. Brush the child psych experts off your shoulder, and tell the early childhood specialists to shove off.
Mata asobou, ne!
And then your 3-year-old...wads the paper into a ball...wants to tear it to bits...throws a tantrum because s/he "can't!"...
Ok--so how about the simple kind? The kind my kids learned to do in kindergarten. As in, fold a sqare in half for a mountain. Really, that's how they start out over here (with 3-year-olds, some of whom are still in diapers, so how hard can they make it?), with really young kids using regular origami paper which is cheap (dollar shop) here, but possibly not so (or not readily available) in other countries. No worries--thin catalogue paper works just fine, as does newspaper. My kids' teachers used both of those at Yochien (kindergarten), too. Start simple--no need to give yourself a headache trying to fold something out of a book with 47 steps. How about 3?
My oldest son used to come home at least once a week with an intricately folded "shuriken" ("throwing star"-all the boys want those) made from two pieces of paper torn from a catalogue. His two-year-old brother, of course, coveted it as soon as he saw it. And, not knowing what to actually *do* with it, pulled it halfway apart--resulting in much wailing, smiting (of younger brother), and pleas to mommy to "fix it". No clue. Major headache. I had to get a japanese origami book, look up a bunch of words, and learn how to fold the fool thing myself just to achieve a temporary cease-fire. Maybe I should have started kindergarten myself...
I'll post the shuriken later-- it's fun to fold side-by-side with your kindergartner once they can fold simpler things evenly. By "kindergartner", I mean third year, like a 5 1/2 or 6-year-old.
So, let's make a house! Or, heck, a whole street of houses, big ones and little ones, decorated to taste. Make them stand-alone, or glue them onto a piece of construction paper, as you like. It's Saturday for me here in Tomorrowland, but for anybody reading this from the Western Hemisphere, why it's still Friday, so you get a little jump on the weekend. Figure it out *before* the weekend,eh.
1) fold a thin square in half, and unfold (guide fold made)
2)fold the top corner down, lining up the edge of the paper with the guide fold.
3)fold the other corner down, trying not to have a white space in the middle.
4)et voila! A house. Draw a door, some windows, whatever you like. Glue down the flaps, or not.
Leave the roof flaps loose and draw surpises underneath. Have fun! Photos below:


Mata asobou, ne!
Subscribe to:
Posts (Atom)